Ever wished you could cast Expecto Patronum and actually see your Patronus appear?
We can’t promise the spell will work in your living room. But you can make your own Harry Potter-inspired Patronus at home, and with a few simple craft supplies, you can create one that actually glows.
The easiest method is to make a DIY Patronus light using a printed animal silhouette, cardboard, white or silver paint, and small battery-powered fairy lights. You can use a stag, otter, doe, rabbit, wolf, dog, or whatever animal you want your Patronus to be.
And if you don’t know your Patronus yet, start with the Harry Potter Patronus Quiz and discover which animal fits you before you start crafting.
Let’s make it.
What You’ll Need
You don’t need expensive craft equipment for this project.
Basic materials
- A printed picture or silhouette of your Patronus animal
- Thick cardboard
- Pencil
- Scissors or a craft knife
- White or silver paint
- Paintbrush
- Small battery-powered LED fairy lights
- Clear tape
- String or thin hanging wire
- A ruler, optional
- Black marker, optional
For a more magical finish, you can also use:
- Silver glitter
- Translucent paper
- White tissue paper
- Small adhesive gems
- A transparent plastic sheet
- A small battery-powered LED puck light
Tip: Use LED lights rather than candles or anything that produces heat. They’re safer, easier to hide behind the craft, and give you the glowing effect you’re looking for.
Step 1: Choose Your Patronus
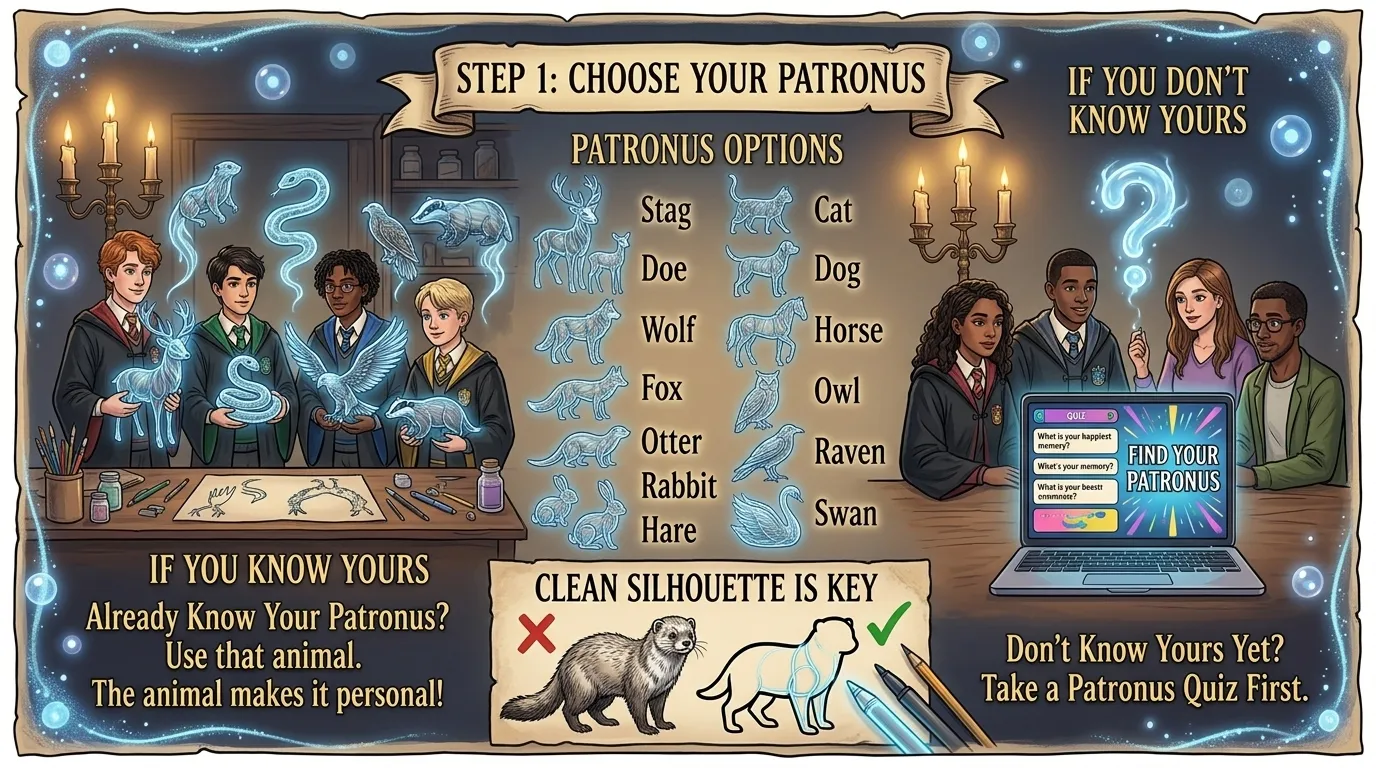
Before cutting anything, decide which animal you want to make.
You have two easy options.
Already know your Patronus? Use that animal.
Don’t know yours yet? Take a Patronus Quiz first.
This is worth doing because the animal is what makes the finished decoration feel personal rather than just another Harry Potter prop.
If you’re making the craft for a Harry Potter party or bedroom decoration, popular choices include:
- Stag
- Doe
- Wolf
- Fox
- Otter
- Rabbit
- Hare
- Cat
- Dog
- Horse
- Owl
- Raven
- Swan
You can also create a Patronus that isn’t one of the most familiar Harry Potter examples. The important thing is getting a clean animal silhouette that will be easy to cut.
Step 2: Find or Create Your Animal Template
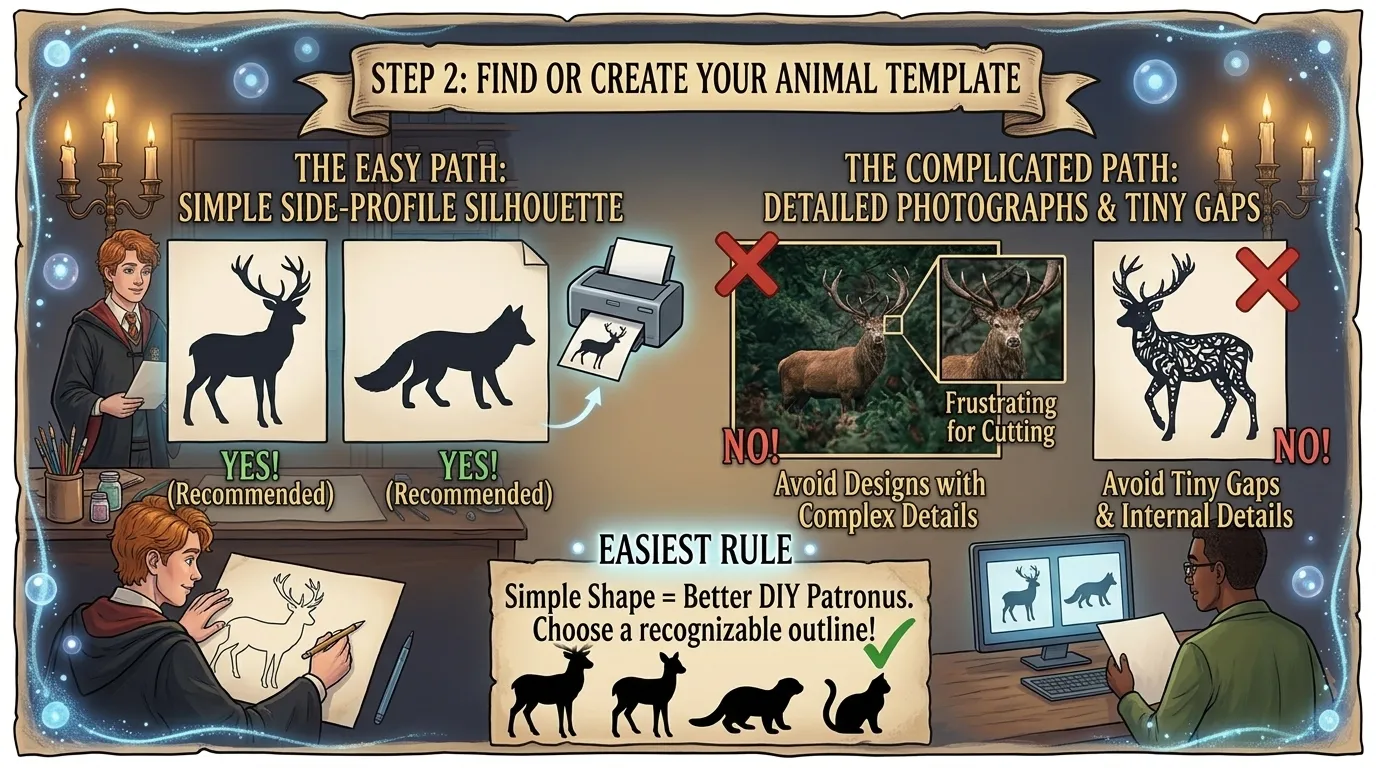
Print a simple side-profile silhouette of your Patronus.
A silhouette works better than a detailed photograph because you only need the outline of the animal.
For example, if you’re making a stag Patronus, look for a clear side-facing stag silhouette with recognizable antlers.
Try to avoid designs with lots of tiny gaps and complicated details. They may look great on a screen but become frustrating when you’re cutting cardboard.
The easiest rule
Simple shape = better DIY Patronus.
You want people to recognize the animal immediately, especially once the lights are turned on.
Step 3: Trace the Patronus Onto Cardboard
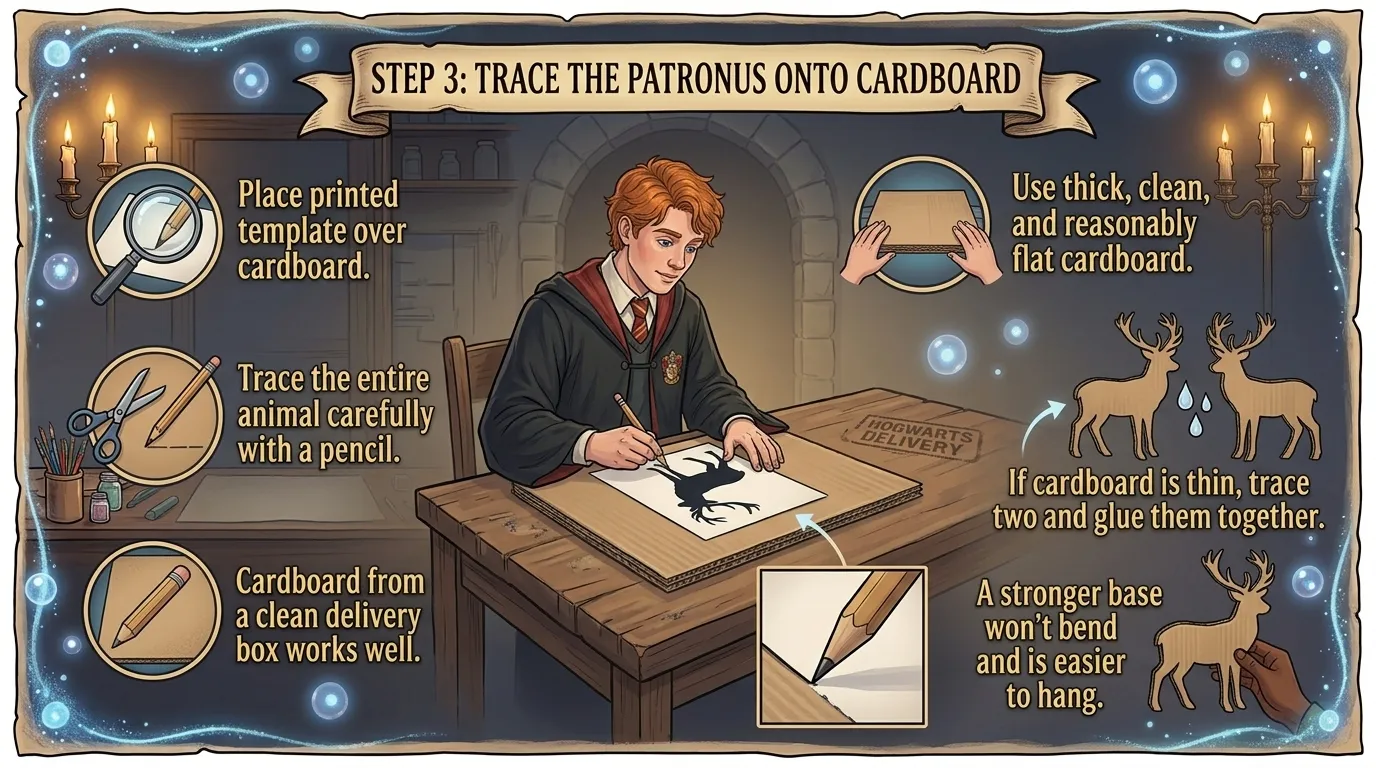
Place your printed template over a piece of thick cardboard.
Trace around the entire animal carefully with a pencil.
If your cardboard is thin, trace the animal onto two pieces and glue them together later. A stronger base will make your Patronus easier to hang and less likely to bend.
For a large wall decoration, cardboard from an old delivery box works surprisingly well.
Just make sure it’s clean and reasonably flat.
Step 4: Cut Out the Patronus
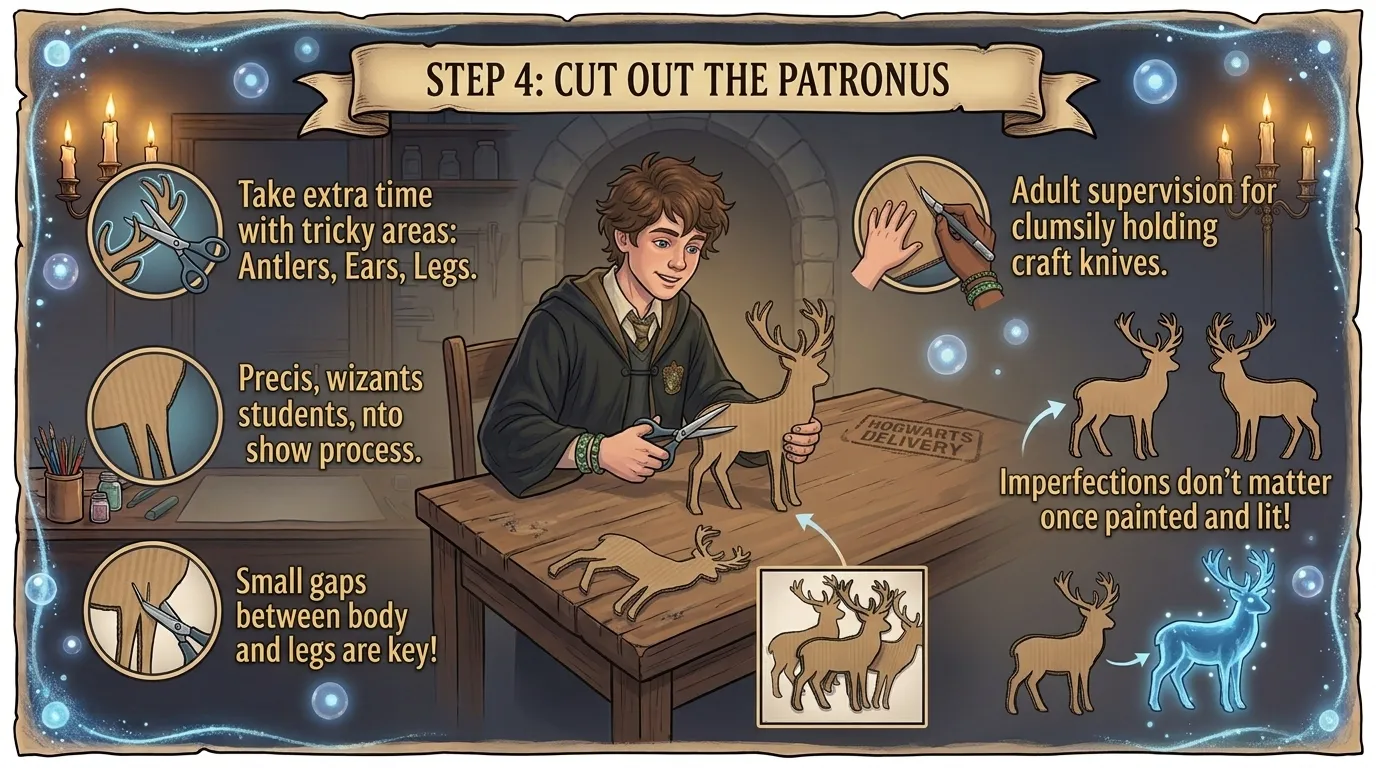
Now carefully cut around the outline.
If you’re using scissors, take your time around areas such as:
- Antlers
- Ears
- Tails
- Legs
- Wings
- Small spaces between the body and legs
For younger children, an adult should handle the cutting, particularly if you’re using a craft knife.
Don’t worry if the cardboard isn’t absolutely perfect. Once the paint and lights are added, small imperfections become much less noticeable.
Step 5: Paint It Silver or White
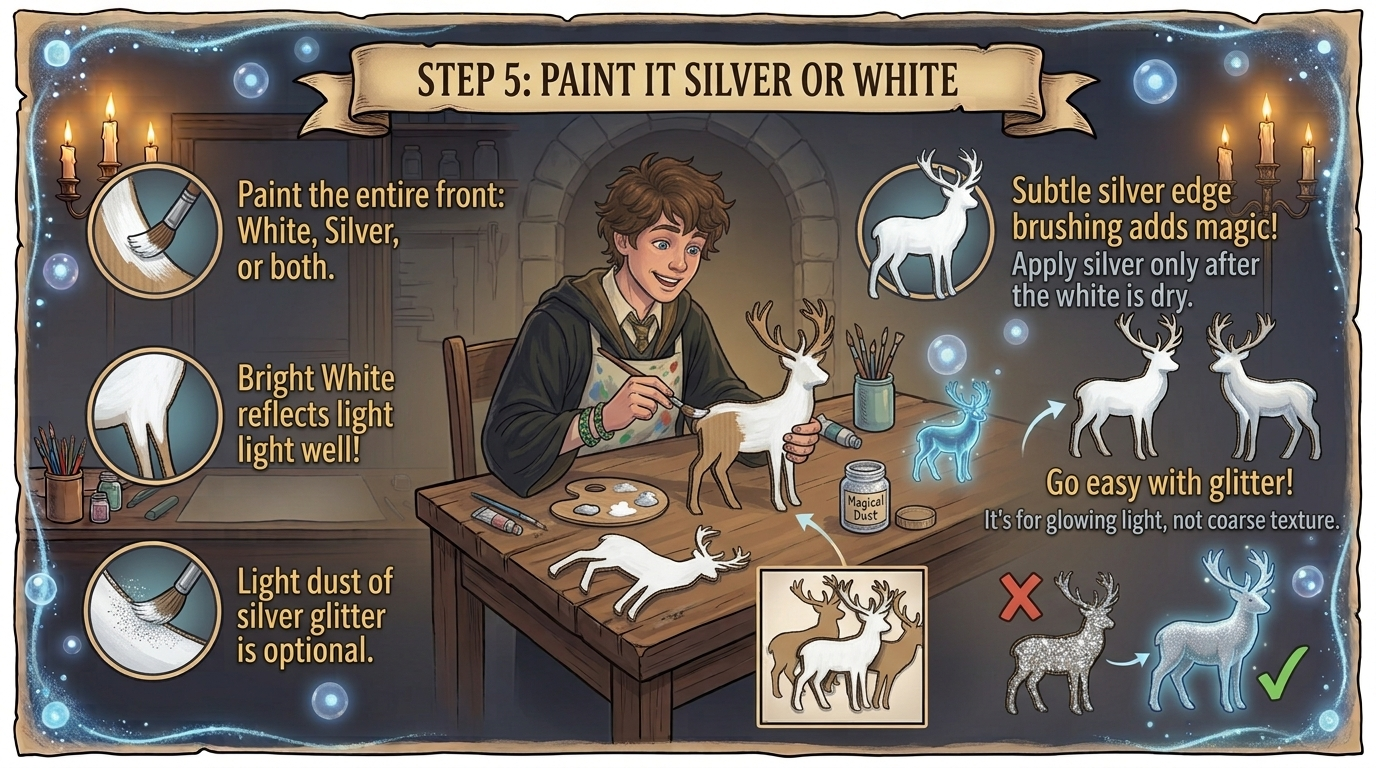
This is where your cardboard animal starts looking like a Patronus.
Paint the entire front of the shape with white, silver, or a combination of both.
A bright white base is usually the easiest choice because it reflects the light really well.
Let the first coat dry completely before adding another one.
For a more magical effect, lightly brush silver paint over the edges after the white paint has dried.
You can also add a very small amount of silver glitter, but don’t overdo it. The goal is to make the Patronus look like glowing magical light, not like a glitter-covered cardboard animal.
Step 6: Add the Fairy Lights
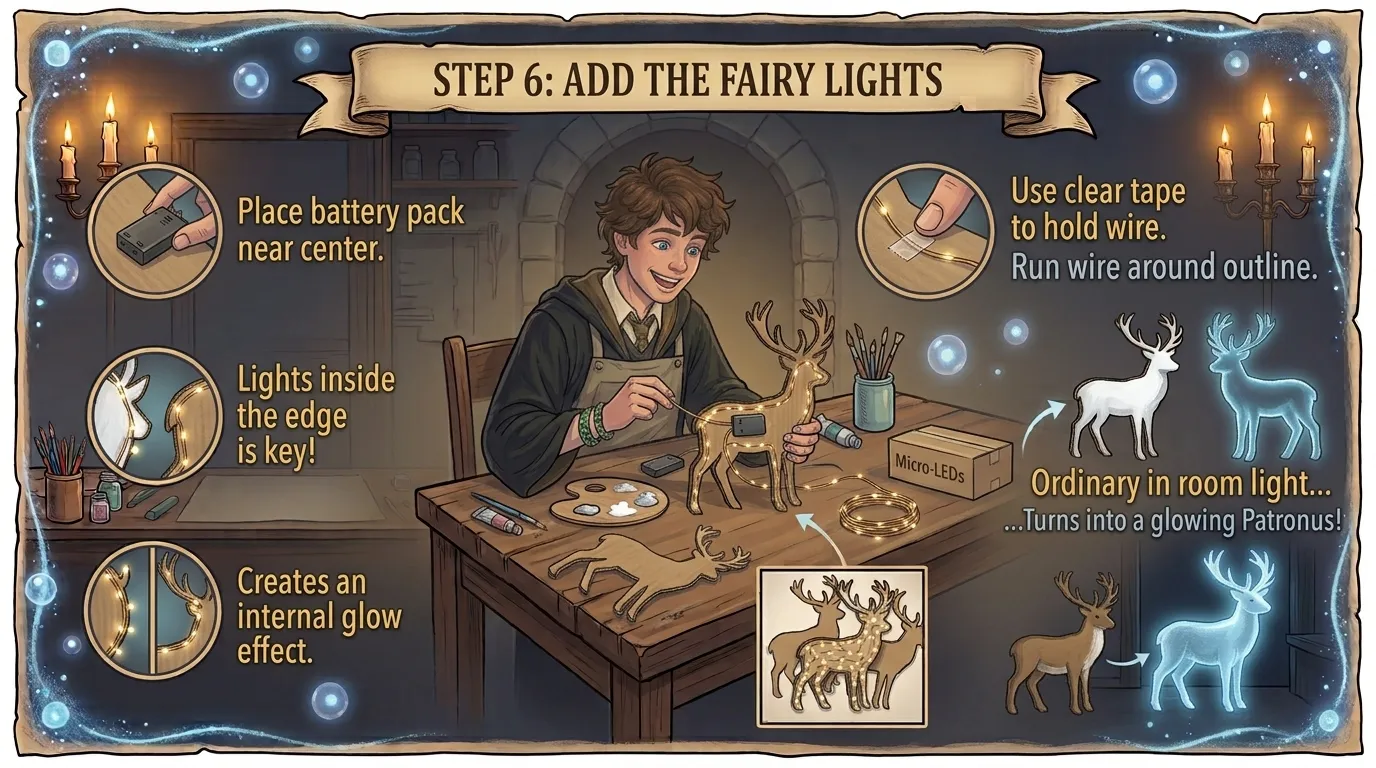
Turn your Patronus over so the painted side is facing down.
Place the battery pack near the center or behind the thickest part of the animal.
Then carefully run the LED fairy lights around the outline of the Patronus.
Use small pieces of clear tape to hold the wire in place.
Try to keep the lights slightly inside the edge rather than directly on the outside border. This helps the light appear to come from inside the Patronus instead of simply outlining a piece of cardboard.
This is the part that makes the biggest difference.
In normal room lighting, your creation will look like a painted animal. Turn the room lights down, switch on the LEDs, and suddenly you have a glowing Patronus.
Step 7: Hide the Battery Pack
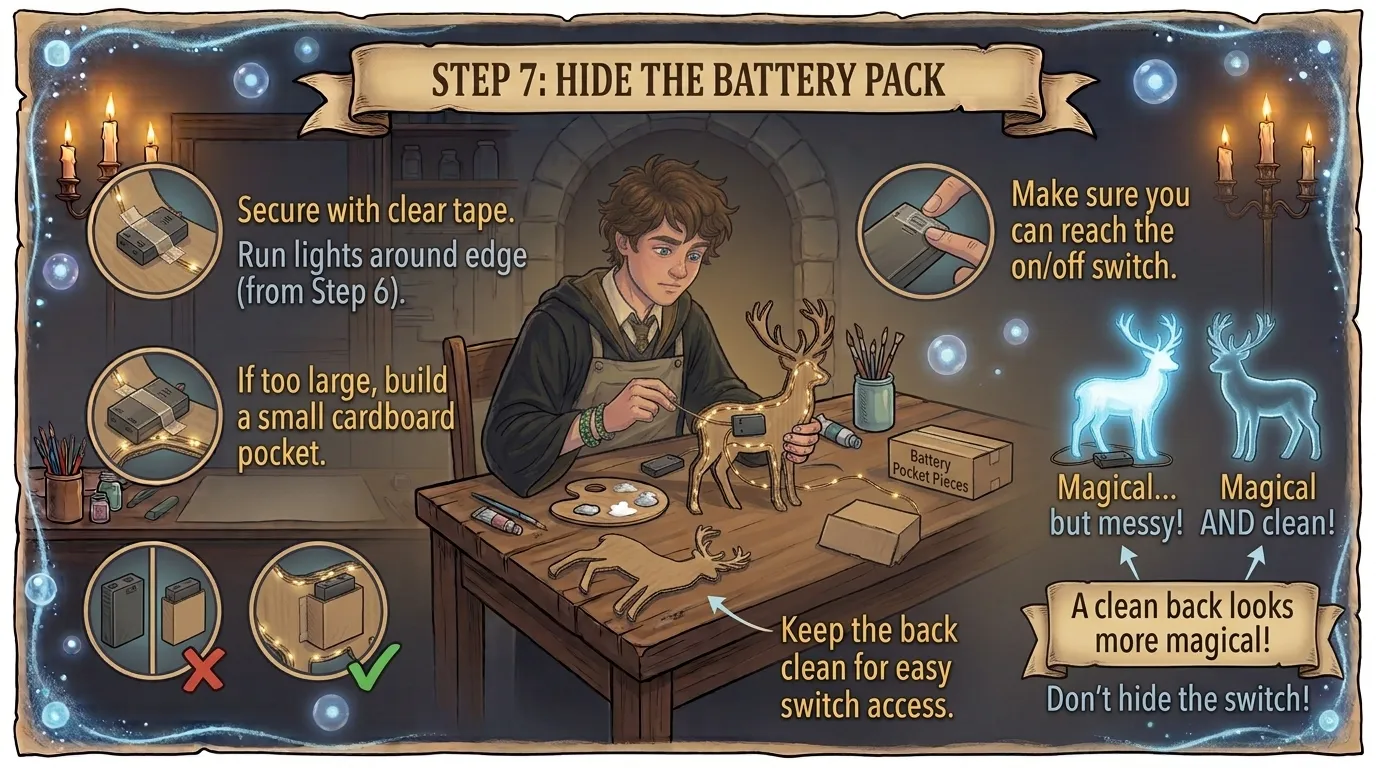
The battery pack is usually the least magical-looking part of the project.
Luckily, it’s easy to hide.
Place it behind the body of the Patronus and secure it with tape. If the pack is too large to hide completely, you can create a small cardboard pocket on the back.
Make sure you can still reach the on/off switch.
Don’t permanently seal the battery pack inside the decoration because you’ll eventually need to replace the batteries.
Step 8: Add a Hanging String
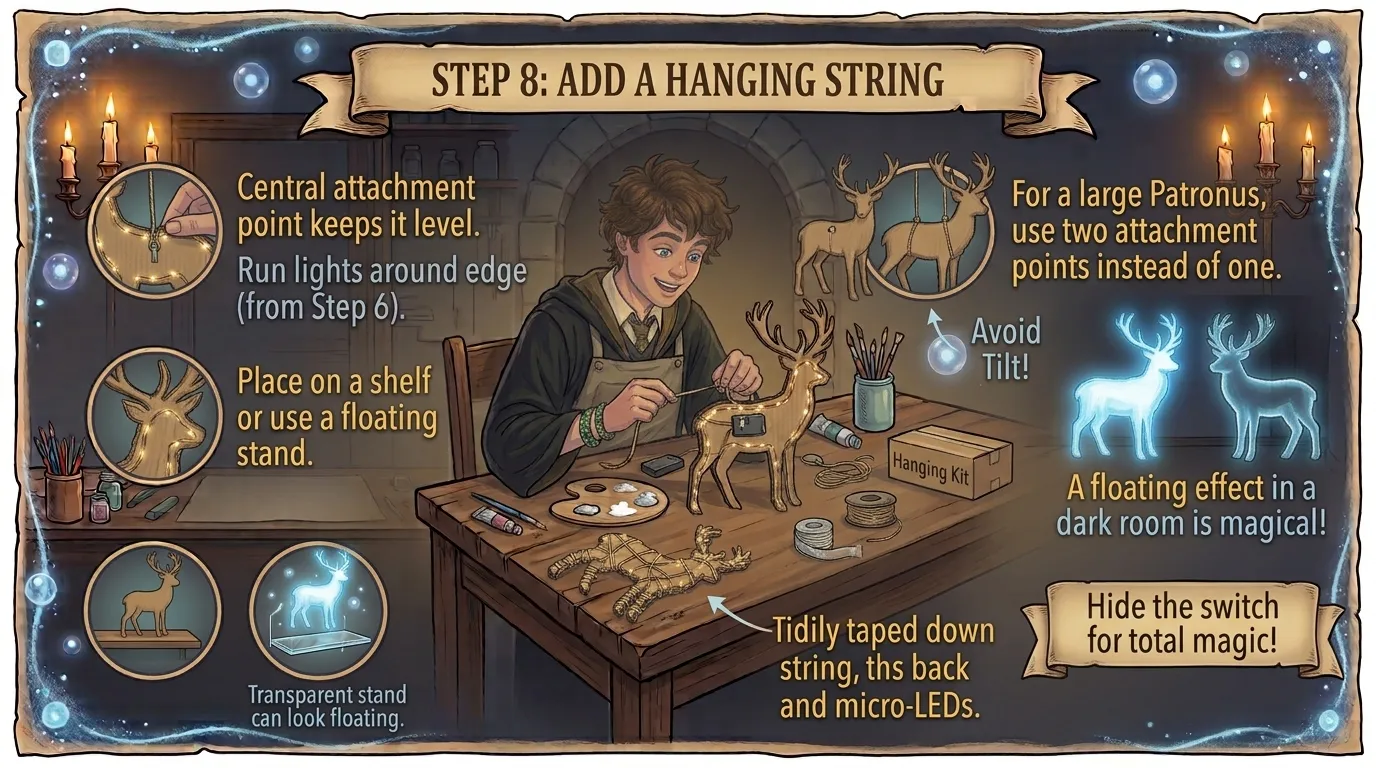
If you want your Patronus to hang on a wall, attach a short piece of strong string to the back.
Put the attachment point close to the center of the animal so that it doesn’t tilt when you hang it.
For a large Patronus, use two attachment points instead of one.
You can also place the Patronus on a shelf rather than hanging it.
A transparent stand can make it look as though the animal is floating, especially in a dark room.
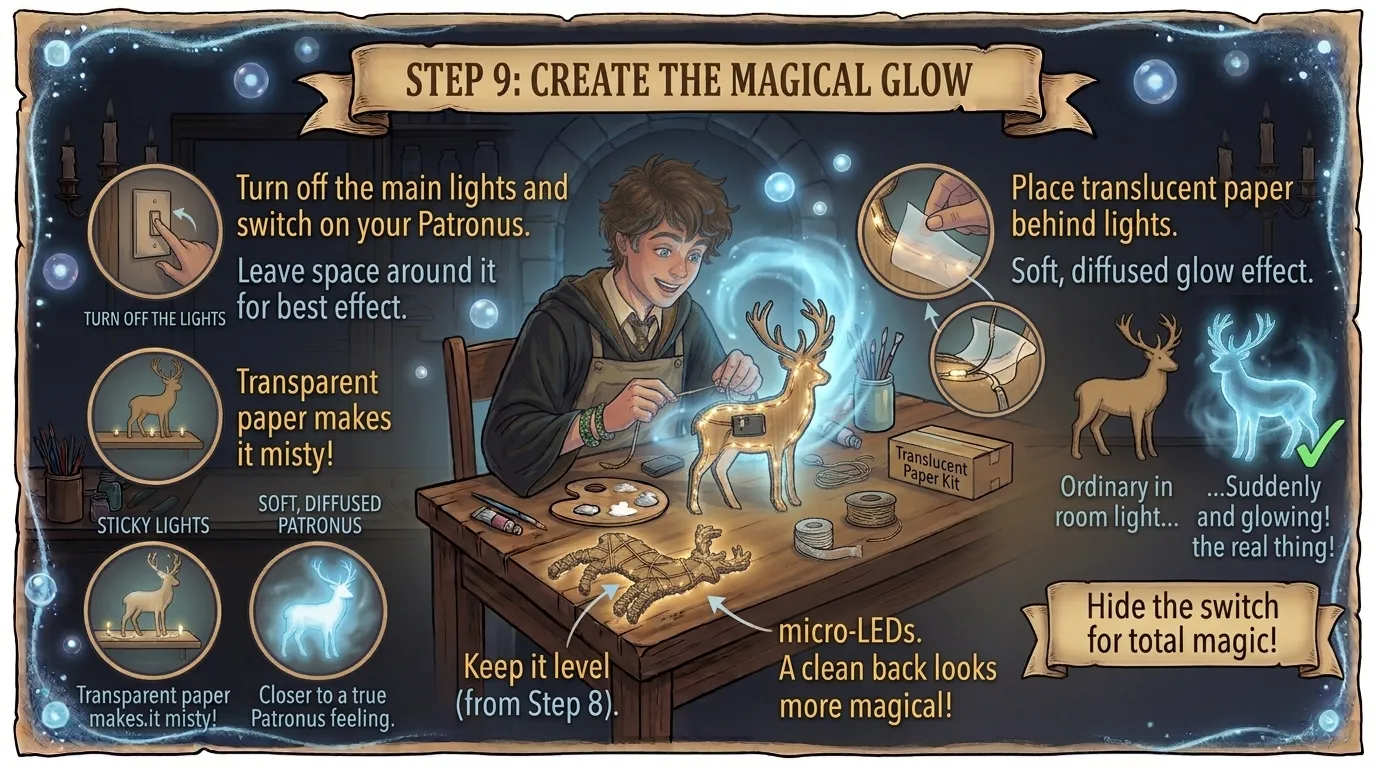
Step 9: Create the Magical Glow
Now comes the fun part.
Turn off the main lights and switch on your Patronus.
For the best effect, place it against a darker wall and leave some space around it.
White and silver surfaces will reflect the LED light and make the animal appear brighter.
If you want an even softer effect, put a thin layer of translucent white paper behind the lights. It diffuses the LEDs and gives the Patronus a more misty, magical appearance.
That’s much closer to the feeling of a Patronus than simply sticking bright lights around the edge.
Three Easy DIY Patronus Ideas
The cardboard-and-LED version isn’t your only option.
1. DIY Patronus Wall Light
This is the best option if you want a large decoration for a bedroom or Harry Potter-themed room.
Create a cardboard animal, paint it white or silver, and attach LED lights behind it.
The official Harry Potter website has also featured a Patronus light craft using printable Patronus templates.
Best for: Bedroom walls, Harry Potter parties and room décor.
2. DIY Patronus Lantern
Instead of hanging the animal directly on the wall, make a small lantern around the silhouette.
Use a clear or translucent container, place your Patronus silhouette inside, and add a battery-powered light source.
This creates a softer glow and works particularly well as a desk or shelf decoration.
Best for: Desks, shelves and nighttime decorations.
3. DIY Patronus Ornament
Want something smaller?
Create a miniature version of your Patronus and turn it into an ornament.
You can use cardboard, felt, foam or another lightweight material. Add a small ribbon at the top and decorate the edges with silver thread.
Best for: Christmas trees, Harry Potter parties and small gifts.
How to Make Your DIY Patronus Look More Real
The biggest mistake people make with DIY magical crafts is adding too much.
You don’t need dozens of decorations.
Instead, focus on shape, light and placement.
Here are a few simple tricks:
Use a strong silhouette
A recognizable animal will look much better than a complicated shape with too many details.
Use cool white light
Cool white LEDs generally give a more magical, silvery appearance than warm yellow lights.
Keep the background dark
A darker background makes the Patronus glow stand out.
Hide the wires
The less visible the wiring is, the more convincing the final decoration looks.
Don’t cover everything in glitter
A little silver detail is enough. Too much glitter can make the craft look more like a party decoration than a Patronus.
Can You Make Your Actual Patronus at Home?
Not quite.
If you’re talking about the Harry Potter magic, there isn’t a real-world spell that can produce a silver animal from your wand.
In the books and films, a Patronus is created through magic and is closely connected with positive memories and emotion. The spell is Expecto Patronum.
But you can absolutely make a physical Patronus decoration that captures the look of one.
And honestly, that’s probably the next best thing.
What Should Your DIY Patronus Be?
If you haven’t discovered your Patronus yet, don’t simply choose an animal because it looks cool.
Take the HarryQuiz Patronus Quiz and use the result for your craft.
Once you know your animal, you can also learn more about what that Patronus represents in the wizarding world with our Patronus Meanings guide.
Want to make the whole thing feel more like your own Hogwarts character?
You can also discover your Hogwarts character, find the wand that matches you, and take the Sorting Hat Quiz to discover your Hogwarts house.
If you’re especially curious about your house, explore the individual Gryffindor, Slytherin, Ravenclaw, and Hufflepuff profiles too.
DIY Patronus FAQ
What is the easiest way to make a DIY Patronus?
The easiest method is to cut your Patronus animal from cardboard, paint it white or silver, and attach battery-powered LED fairy lights behind it. You can then hang it on a wall or place it on a shelf.
What materials do I need to make a Harry Potter Patronus?
You’ll need a Patronus template, cardboard, scissors, white or silver paint, a paintbrush, battery-powered LED fairy lights, clear tape and string. Most of these are inexpensive and easy to find.
Can I make any animal into a DIY Patronus?
Yes. For a craft, you can choose any animal you like. If you want the animal to represent your personal Patronus, take a Patronus quiz first and use that result as your template.
How do I make my Patronus glow?
The simplest way is to attach small battery-powered LED fairy lights behind the cardboard animal. White or silver paint helps reflect the light and makes the Patronus appear brighter.
What color should a Patronus be?
Patronuses are generally depicted as silvery or silver-white magical animals. For a DIY version, white paint combined with cool-white LEDs is an easy way to recreate that appearance.
Can I make a Patronus without fairy lights?
Yes. You can make a simple cardboard, paper, felt or painted Patronus without lights. However, adding LEDs gives it much more of the glowing effect associated with a Patronus.
What is the best Patronus to make for a Harry Potter party?
A stag is one of the most recognizable choices because it is Harry Potter’s Patronus. However, an otter, doe, wolf, rabbit, owl or another animal can make the decoration more personal.
Final Thoughts
Making a DIY Patronus doesn’t have to be complicated.
Start with the animal, create a clean silhouette, paint it white or silver, add a few hidden LED lights, and give it a dark background. That’s really all you need.
The best part is that you can make the project personal by using your own Patronus rather than simply copying Harry’s stag.
So, find your Patronus, grab some cardboard and fairy lights, and get crafting.
Expecto Patronum!